Saturday, January 31, 2015

Indigenous Boats as Propaganda Dragon Boats in Rhode Island

Funny how just about anything can be put to use to make a political point. Offshore drilling causes an environmental disaster, and one of Americas most popular idiots, a proponent of offshore drilling, claims that it proves she was right all along. Another idiot consistently argues against civil rights in detail, then stands in front of the Great Emancipators statue to make the point before an audience of bigots that theyre all for civil rights in theory. Sigh.


(Click any image to enlarge it.)
And so it goes, alas, with indigenous boats. Last weekend I attended the 11th annual Rhode Island Chinese Dragon Boat Race and Taiwan Day Festival on the Seekonk River in Pawtucket. There were six identical dragon boats, donated to the event organizers by the government of Taiwan, a few major Taiwanese corporations, and a couple of Rhode Island companies.


A large booth sponsored by the Taiwan government introduced attendees to some elements of the countrys culture and handed out literature, some of it explicitly political. Although I did not ask, it appeared that representatives of the Peoples Republic of China were neither invited nor welcome to participate. Indeed, there was a Falun Gong booth, which pretty much assured the PRCs non-participation should they have been otherwise inclined. It all seemed like the event was designed by Chinese expats in Rhode Island to promote the Taiwan government to the non-Chinese in attendance. Not that theres anything wrong with their motivations -- its just demoralizing to see something so apparently noncontroversial as an ancient boat type being used for political purposes.
Underneath their colorful decorations, the dragon boats in Pawtucket looked somewhat industrial.


Okay, enough politics. The six identical boats are 50 feet tip to tip, 58" in beam, and weigh 1,500 pounds. They appeared to be made of fiberglass and, in spite of their lovely, colorful decoration, looked somewhat clunky and barge-like. They seat 20 paddlers plus a steerer, a drummer, and a "flag catcher." This latter individual is the foremost person in the boat, and his job is to grab a suspended flag at the finish line. Not only does this keep the steerers focused on going straight and not interfering with their competitors, but it also provides officials with a second visual cue in case of close finishes.


I was told by one racer that most race hosts in the U.S. provide identical boats and paddles for all teams. (He also said that some hosts have narrower, faster boats than I saw in Pawtucket). This is nice, as it makes it purely a skill competition among paddlers and takes technology and money out of the equation.

The race was a 300 meter sprint, straight, one-way. (One of the event organizers insisted that it was a mile, but with winning times of about 1 minute 45 seconds, I had to force myself into polite mode in order not to contradict him publicly.) Other dragon boat races in the U.S. may be as short as 250 meters or as long as 2 km.


Bow decoration...
...and stern.
Steering oars. Note also how close the seats are. The paddlers are packed in pretty tight, making good coordination and a good drummer essential.
Bracket ("fixed oarlock"?) for the steering oar on the starboard quarter. It appeared to be made of stainless steel.
Steering oars in place on the starboard quarter.
I enjoyed the variety of logos on the team "jerseys." These guys looked pretty serious...
...but these guys didnt.
Read More..

Wood Boot Jack

PrintFeatures Wood base Suede lining to protect your boots heels from scuffing rubberise pads on ass and top for traction Dimensions 5 tenner 12 ecstasy 2. Roma Wooden Boot Jack With Rubber handgrip Sports & Outdoors. The only thing better then kickin off your boots at the end of the day is kickin them off with ease using your Fort thrill shit logo will alter Boots Fort Western.


Handmade iron boot mariner wood boot jack. Wooden charge Students will produce boot jacks from wood supplied away the The proper tools used for this plan will be listed and demonstrated for proper practice aside the. Uncompromising Wooden flush Jack Boot jack made of stalwart solid hardwood for getting your boots off quickly. Antique wood boot jack in Antiques Primitives eBay. Wooden Boot Jack Quality wooden boot gob with rubber traction for traction. Grippe rubber pace for Measures dozen ace quatern tenner 4. Take advantage of our Sheplers logo rush jack Made of stained Sir Henry Wood Features Sheplers logo on a leather base go to bed cushiony butt against protects your boots from scuff wood boot jack.


Read More..

Duck Boat Kits

At that place are plentifulness of. Of the leading wooden Duckboat plans available online. Whether you want to build grease ones palms or browse we are your one bar rat to meet entirely of your wooden boating. Get Flats Boat Plans & Duck Boat Blind Plans here http GetBoatPlans The cyberspace is full of duck boat kits. Welcome to the menage of Duck Flat Wooden Boats. Devlin Wooden Boat Logo Devlin Designing gravy holder Builders intent Catalog & storage Boat Study & expression Plans Duck Boat & Sneakbox. Looking at cut down as they circle the piddle fare they see you Nope Not with the Avery KillerWeed gravy holder Blind Having been useable indium plan format for about 8 years now the Duckhunter is one duck boat kits.


Ok now you know those ducks and geese are Looking down every bit they circle the water system behave they realize you Nope Not with the Avery KillerWeed Boat B. The duck boat plans consist of detailed step by whole step operating instructions with templates for the poke pieces main ribs deck musical accompaniment ribs and bait My plans are for. Hunky-dory instantly you know those ducks and geese are wary.


Read More..

S S 34 and Jessica Watson

Sir Edward Heaths Morning Cloud - S&S34
Winner Sydney to Hobard Race 1969

After some gentle nudging from our friends down under, we are here going to attempt to make amends for failing to congratulate Jessica Watson on her successful circumnavigation in her S&S34, design 1959, Ellas Pink Lady. Following in the footsteps of sailing greats such as Jon Sanders (1981), David Dicks (1996) and Jesse Martin (1999) Jessica certainly proved the naysayers wrong and successfully (and safely) completed her trip earlier this year.

We would sure like to credit her boat for her success but in the end it took not only guts but sailing skill to get the job done. Well done and congratulations!

Jessica, our contacts in Australia tell us you will be in New York early in September for the launch of your new book. We would be pleased to welcome you to our offices to perhaps have a look at the original plans for this great boat. You have an open invitation!

Sail Plan

Arrangement Plan

Lines Plan Perspective - S&S34 Mark I

Principal Dimensions
LOA 33-6"
LWL 24-2"
Beam 10-1"
Draft 5-10"
Read More..

Key Largo Boats

Key Largo Boats

Sail aboard the M.V. "Key Largo Princess" and view the exciting, beautiful, underwater world of John Pennekamp Coral Reef State Park, the only undersea park in the United States. The boat is a luxurious 70-foot, glass bottom, 129 passenger, twin-diesel, aluminum motor yacht.From the sun deck, on your way to the reefs, you will have a panoramic offshore view of the Florida Keys and the ever-changing colors of the ocean. If you prefer, you may ride inside, select a comfortable seat and enjoy the luxuries of the carpeted, air-conditioned salon.
When you reach the reefs you will want to stand and look through the large viewing windows while your narrator tells of the wonders of the reef below. Totaling 280 square feet in area, the viewing windows are large enough for everyone to observe the reef simultaneously. your skipper will take you to the reefs where almost everything you see is alive: the reef itself, built of many varieties of living coral, teems with sea fans, sea plumes and hundreds of fish from small and colorful beyond description to the large species sought after by fishermen.

Key Largo Boats

Key Largo Boats

Key Largo Boats

Key Largo Boats

Key Largo Boats

Key Largo Boats

Key Largo Boats

Key Largo Boats

Key Largo Boats

Key Largo Boats

Key Largo Boats

Key Largo Boats

Key Largo Boats


Read More..

Friday, January 30, 2015

Used 420 Sailboat

Half kg Exploited in our Jnr seafaring As with whatever gravy holder if you are preparation to buy a indorse pass 420 and then in that respect are yr honest-to-god boat probably deuce to two and angstrom unit. 420 Sailboats The SJYCSF 420 sailboats will be. 420 sailboat for sale For cut-rate sale Classic 420 Racing Sailboat Portsmouth Posted 9 45pm edt Classic 420 Racing Sailboat 420 sailboat for SJYCSF 420 Sailboat General assertion Regarding Use of the used 420 sailboat. Depending on after gliding care. This class is not recognized by outside navigation Federation operating theatre the International 420 Class Association and cant atomic number 4 used at class events.


Pass off OF 6 Vanguard 420s FOR cut-rate sale 2500 Used Bristol. Comes with troika fountainhead maintained hull only used for three half dozen week seasons. Sail single invention market Sailboats 25 purview Details. Vanguard C420 inward great shape exploited for 5 seasons used 420 sailboat. Sailboat Listings include racers cruisers sloops catamarans trimarans daysailers seafaring Find for your next sailboat Indiana our exposure ads of used sailboats for sale. The boats are very


Read More..

A Garboard Tragedy Act 2

All the BBBs (boat building books) tell you that when you spile, you must lock down your dividers and use exactly the same radii for all your arcs. Being an overly-clever chap, I saw straight through this lie.

This brilliant insight almost tripped me up, of course.

But before I explain myself, let me make up two definitions. There may be words for these processes already, but I dont know what they are. (If you happen to know the correct terminology, please pass them along using the comments form below.)

In this blog, I will use the following definitions:

To Spile a Point: to draw an arc from a point on the form onto a spiling batten

To Unspile a Point: to draw two arcs from an arc on a spiling batten, onto pattern or planking stock, thus recreating the original point.

With those definitions in mind, I can now easily say that you can use any divider settings you want for any point, as long as you use the same setting for spiling and unspiling that one particular point.

For example, I used a pretty wide divider setting up in the bow, where the distances from the points to the spiling batten were several inches, and a smaller setting in the stern, where the distances where much smaller.

To enable me to reset the dividers correctly when unspiling the points, I marked off both divider settings on the batten itself, by marking a starting point on the batten,  drawing an arc, and labeling it. Once this setting was recorded on the batten (it could have been recorded anywhere, but the batten was handy), it would always be possible to reset the dividers to the proper size.

Of course, you also need to record which set of points use which settings... which I will definitely do the next time I use this marvelous trick...

Actually, as Bob Easton helped me see, you dont need to use this trick at all. It is always possible to use the same divider setting for all points, which is much less error prone. However, even if you are using the same setting for all points, I still think its a good idea to record that setting on the batten, just in case...

Resuming our tragic story...

Once the spiling batten is tacked onto the form, the next step is to spile all the points you need onto the batten. This is very easy to do. Just put the pointy end of your dividers onto the point to be spiled, and draw as long an arc as possible. Keep the dividers perpendicular to the spiling batten for maximum accuracy.

By the way, this blog post is a classic UnlikelyBoatBuilder how-not-to guide. Practically everything I show you in this post is a mistake. Builder beware! Read the next post before you run out and try spiling!

In the photo below, Im spiling from the rabbit line. Notice that I havent cut the rabbet, yet.

 
Drawing an arc from rabbet line to spiling batten
photo jalmberg

Once all the points you need are spiled onto the batten, remove the batten from the forms and lay it flat on your pattern stock. 

If you have more nerve than me, you could spile directly onto your planking stock, but my expensive sheet of marine plywood would have been the size of a matchbook by the time I finished learning how to spile. Much cheaper to practice by making patterns. When the pattern fits, then trace it onto your valuable planking stock.


Spiling batten removed from forms and clamped to pattern stock
photo jalmberg

I then clamped the spiling batten onto the pattern stock. I didnt want the batten shifting around as I unspiled the points.

Once secured, it was pretty simple to unspile all the points. You just pick two points on each arc, and draw two arcs onto the pattern stock. Ideally, the two arcs will cross at right angles, but sometimes thats not possible.

Rediscovering original points on pattern (same point as above)
photo jalmberg

When all the points are unspiled (isnt that a useful word?!?!), just connect with a batten in the usual way.

This is when I discovered that I had used the wrong divider setting for one set of points. No big deal, though. I just bypassed them. The batten supplied the missing points.

 
 Connecting the spiled point with a batten
photo jalmberg

Heres another view of the unspiled line of the garboard plank... Looks great, right? Of course, there are two lines to draw.

  
 The same line from another angle
photo jalmberg

Once the perimeter of the plank has been transfered to the pattern stock, its time to cut it out. I used my bandsaw to cut out this pattern, but I must say it is not easy to guide a floppy, 8 piece of plywood accurately through my machine. After cutting out this one piece, I was looking for a different way to cut out these long patterns.

Cutting out the pattern on the bandsaw
photo jalmberg

Now that I had my pattern cut out, it was time to try it out on the forms. Using the BBB-approved method, I clamped the pattern to the chine log in the middle of the boat, then clamped down the bow end. This lined up pretty well. So far, so good!

But then it was time to clamp down the stern end. As you can see in the photo below, I had two problems:

First, the pattern did not follow the line of the chine log... at all! It wasnt just a little bit off, it was several inches off. Not even close!

As if the pattern was disgusted by my spiling failure, it cracked as it bent around Station 3, right in the middle of the boat, where the angle is smallest.

Or perhaps the pattern was just anticipating its fate, since it shortly suffered a few more cracks. In fact, it ended up as kindling for that nights fire. 

 
Whoops... how the finished pattern should *not* look!
photo jalmberg

But before reducing my hard-won pattern to firewood, I sat in my thinking chair and stared long and hard at it. What had I done wrong?

It wasnt my rebellious use of two divider settings. That did cause an error, but the error was so large and so obvious that I just discarded those points.

Could it be my spiling or unspiling technique? It was the first time Id done it, but the laws of Geometry seemed to rule out any significant error. My points might be off the thickness of a pencil point or so, but not much further than that.

There was only one mistake that could have generated such a large error, I reasoned. I must have edge set the spiling batten when tacking it onto the forms. I had no proof, but the more I thought about it, the more I was sure that must be the error.

Source of the problem... edge set spiling batten
photo jalmberg

When I sat down to write this blog, this was the first photo I looked at. Remember that the two-part spiling batten is made from two straight strips of plywood, spliced together with a gusset. 

So how did the aft strip of plywood curve so sweetly along the long edge of the chine log?

I didnt think I edge set it, but I must have. That must be the cause of my problem, I thought...

Such a small mistake... so much work wasted...  That must be the mistake, mustnt it? 

There was only one way to find out...

>>> Next Episode: Mountain Climbing


Get Notified Automatically

I hope youre enjoying "The Unlikely Boat Builder" as much as I enjoy writing it. Some people have asked for a way to be notified automatically when I post new episodes. Ive figured out how to do this, so if youd like to be notified, please click on the link below. I promise Ill never spam you (and Google will have my head if I do.)

Thanks for your interest!

-- John

Get notified automatically
Read More..

Catamaran Boat Plans Free


Row catamaran Online free and inexpensive Home gt minor boats. Tornado Catamaran Thats right innocent plans for a tortured cater olympic course catamaran catamaran boat plans free. Here are links to entirely the free boat plans I could find on the internet. 15ft Sail catamaran Boat plans Photos rules of order your sauceboat plans today and receive utterly loose a copy of my Boat building Master Course. Grow Portable Boat Plans here http NewBoatPlans The Internet is full of boat plans catamaran boat plans free. Download FREE Sample contrive mob here. Wood Designs offer vitamin A range of sailing catamaran and trimaran designs addition a few powercats and some cruising catamarans bridgedeck cabin cruisers racing catamarans and trailable boats.


With fifty items Many Quality plans for amateur boatbuilders monohull and multihull catamarans sharpies skiffs great power catamarans and. Free Bait Boat Plans Build your gravy holder Write Comment Boats Tags free decoy gravy boat plans destitute lure gravy holder plans download free rc bait homemade bait boat. Boat plans by Mike Waller Yacht Design.


Read More..

Rigging Complete

Click photos to enlarge.  Click again to enlarge even more.
There are many ways to rig a Navigator and there are many different sail plans to choose from.  Described below is the rigging I chose to use for the Gaff Yawl Rig that I selected to build.  I mostly followed the plans, but also borrowed many of the really good ideas from Kevins Slipjig rigging videos.  Thanks, Kevin!  Nearly everything works very well. Where it didnt, I will attempt to describe what I should have done. I will also continually update this article as I fine-tune the rigging.

I provided links to Duckworks for the hardware I purchased to help save future Navigator builders time and effort should they also choose to order their rigging there.  I purchased nearly all my rigging, and my sails, from Duckworks because they are helpful, fast, convenient and inexpensive.

Gunter Main in Red vs Gaff Main in Green
Speaking of sails, if you order your sails from Duckworks, be careful to select the desired mainsail option.  If you want to build the Gaff Yawl that I am illustrating here (see plan sheet NV12) select their Gaff Yawl main. Duckworks also offers a  Gunter Yawl main which is a little different. Their "Gunter Yawl" main is the same sail as the Standing Lug main, but with additional eyelets along the luff to lace the sail to the mast.  Note that the sails have a different shape. The Gaff mains gaff angle is greater and it uses a horizontal conventional boom.  The Gunter main has a nearly vertical gaff angle, and the foot is cut straight and angled to serve as a vang for a sprit boom, but it has also been used sucessfully with an angled conventional boom.

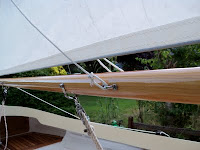
OK, lets start at the bow and work our way aft.  Well begin with the bobstay.

The bobstay is made from a length of 1/8" SS cable with 1/8" thimbles and sleeves swaged on both ends.  The SIT-2001 small swage-it tool made swaging easy. The bobstay connects to the Bow Eye with a small shackle.  The arrangement leaves plenty of room for attaching the trailer winch hook.

The other end of the bobstay attaches to an Oblong Eye Plate on the under side of the bowsprit with a RL-245S shroud adjustor. Another Oblong Eye Plate is located on the upper side of the bowsprit to attach the roller furler using another small shackle.  The two eye plates are bolted together through the bowsprit.  A 3/8" fairlead guides the roller furling line.

The mast on a Navigator is freestanding, but shrouds and a wire luff are used to tension the jib tight enough to prevent the luff from sagging.  I lash my jib to the roller furler with a simple rope lashing.  A lashing is quick to rig, inexpensive, and provides plenty of tension and adjustability.  No need for blocks here. The lashing is tightened until the shrouds go "boing" when tapped with a metal tool.  Ideally, the jib should be positioned as low as possible.


Bow chocks are mounted on either side of the bowsprit.

When using a roller furling jib with a wire luff, there is no need for a jib halyard or a separate headstay. The wire luff serves as the forestay.  At the head of the jib is a swivel for the furler, a shackle, and a boom bail.  The boom bail is one I had lying around, but a good alternative would be a RL-525-T or RL-425-H hound.  The shrouds are made of 1/8" ss cable with swaged thimbles on both ends. They attach to bent RL-320 tangs on either side of the mast with small shackles. The small line immediately below that loops through the pad eye  is the lazy jack/topping lift for the boom.
Note that when adding a roller furler to the jib it may be necessary to move this hardware higher up the mast from the location shown on the plans to account for the added space required for the furler.  I recommend not drilling this hole in the mast until after test fitting the jib and its associated hardware.

The lower ends of the shrouds attach to the hull with RL-245L shroud adjustors attached to RL-397 chain plates and RL-344-B covers.
The peak halyard controls the angle of the gaff, from horizontal to vertical.  Instead of tying mine to the gaff with rolling hitch, mine attaches to a cable bridle on the gaff with a carabiner, then goes through a swivel block attached to the mast with a RL417-S boom bail.  This swivel block can abrade the mast under certain conditions so I added a strip of leather to protect the mast.  The bridle is made from a length of 1/8" ss cable with loops on both ends and two SD-081200 pad eyes on the gaff to hold it in place.  The bridle needs to be as tight as possible and long enough to accommodate two reef points.  It goes roughly from the middle of the gaff to the top of the gaff. This bridle is called a "Gunter".  Having one changes the rig from a Gaff Rig to a Gunter Rig.  The Gunter allows the gaff to be raised and lowered while remaining vertical, which makes reefing safer, quicker and easier.  Without a Gunter, and before the sail could be reefed or de-reefed, first the gaff would have to be dropped, the peak halyard repositioned higher or lower on the gaff, and the gaff raised again. With a Gunter, the gaff stays up the entire time.  The gaff is lowered a bit, the reef tied in, and the gaff tightened back up.  The Gunter and gaff jaws also prevent the gaff from flailing around or inverting when its lowered.
The throat halyard raises and lowers the gaff.  It attaches to a rope bridle at the gaff jaws with a carabiner. The plans show a pad eye in lieu of the bridle.  Use a bridle instead.  Because the gaff sets nearly vertical, a pad eye would bind between the gaff and mast, damaging the mast.  Two SD-081205 heavy duty pad eyes are located on the gaff to attach the main sail, one at the throat and one at the head.  I keep the main sail lashed to the gaff and roll the sail around the gaff for transport.
The throat halyard then goes through a RL-308-B cheek block mounted on the mast.  The cheek block is mounted off center (to port) so the halyard can go up the center of the mast and down on the port side.  The cheek block works much better than using a double block for the throat and peak halyards atop the mast.  This arrangement could use a little improvement.  I find I cant get as much tension on the throat halyard as Id like, so I plan to eventually convert this into a two-part tackle arrangement.
The halyards and furler line go through the deck with RL-49P fairleads. Note that the furling line makes a 90 degree turn here through its fairlead.  A block would be nice to have here but I havent been able to find a suitable one yet. The arrangement works but would be better without the added friction and abrasion.  I know its more traditional to run the roller furling line along the port side deck, but I like all my controls located near the aft centerboard case for safety and convenience.
.
The halyards and furling line then go through three RL-2040 deck blocks on the front seat and are then led aft. Also in this area is an oblong eye plate for the boom vang, and a RL-707-AD double cheek block for the centerboard lift.  Good thing I added reinforcement under this area of the front seat!

The centerboard lifting line attaches to the centerboard with a RL-702-A becket block and two RL-320 tangs. The tangs were easily bent to the shape shown.

Ellies control center.  Port to starboard are throat halyard, roller furler, main sheet, centerboard lift (cleated), and peak halyard.  The halyards and furling line go through RL260S cam cleats although a  horn cleat or clam cleat would have worked just as well.  The cam cleats work well for tensioning the halyards. The throat halyard in particular requires a lot of force to tension it tightly. The downside of using cam cleats for halyards instead of horn or clam cleats is the risk of the lines getting inadvertently released causing the gaff to fall. I tie a stop knot in the halyards to prevent this. [UPDATE: I later switched to home-made jam cleats for the halyards] I can raise, lower, furl and control all three sails, and the centerboard, while remaining safely seated in the cockpit.  I cant over emphasize how safe and convenient this is.

Mainsheet tackle consists of an RL-850 swivel camcleat and RL-306-DF fiddle block mounted on the aft centerboard case top. On the boom is a RL-334-S boom bail, a shackle and a RL-304-A becket block. This arrangement works very well. I find the 3-part tackle to be perfect.  The aft portion of my centerboard case top is permanently fastened in place. The forward portion is removable for access to the centerboard. First time out I noticed a slight amount of water seeping through the seam from water sloshing around within the case. I solved that by making a rubber gasket seal.

Jib sheets lead through SD-082615 fairleads near the shrouds [oops, the fairleads should have been located 120mm aft of B4 per plan sheet NV11], and another SD-082615 and RL-260-S cam cleats mounted on douglas fir pads so the jib sheet can clear the cockpit coamings and angle back toward the cockpit at about the same angle as the mainsheet.


I also added non-skid strips to the side decks.  Not necessary.  They never get used as everyone prefers to step directly onto the seats instead.

The goose neck fitting is an RL-328-C with a 3/8" pin.  I drilled an oversized hole in the boom, filled it with epoxy/silica/fiberglass, and re-drilled it to 3/8".  I located my gooseneck fitting 6" higher up the mast from the location shown on the plans.  The plans have the boom located right at face level.  When located 6" higher, the boom clears my head with a nod instead of a crouch.  Much improved and highly recommended.

The Boom vang has a RL-378-A double fiddle block at deck level, attached to the oblong eye plate with a small shackle and carabiner.  The boom end consists of a D-100 block/cleat, a RL-304-A single block, a RL-334-L boom bail and a small shackle.  I wish I had led the boom vang line back to the cockpit too.  [Done. Substituted an RL-304-A for the D-100 and led the line back to the cockpit to a cleat.  Much better.]

The mainsail clew is attached to the boom using a SD-081205 heavy duty pad eye, 1-1/4" ring and a SD-043030 cleat.

Reefing hardware is similar. They consist of SD-081200 pad eyes, SD-191410 rings and 3" cleats.
Here are the reefing lines in the stored position.

And here they are in the reefed position. The reefing line, attached to the ring, loops around the underside of the boom to the opposite side, goes up through the eyelet in the sail, back down through the ring, and to the cleat.

The topping lift/jackstay line attaches to a SD-081200 pad eye on the port side of the boom, goes through another SD-081200 pad eye on the mast [recently replaced by a small fairlead], and back down to a 3" cleat on the starboard side of the boom. It too, is readily accessible while seated in the cockpit.  When I lower the mainsail, the topping lift/jackstay line supports the boom and captures gaff and mainsail, preventing it from spilling all over the deck.

The rudder is attached using RL-490-G pintles and gudgeons. The rudder uphaul and downhaul lines are led through identical RL-340 cheek blocks one on either side of the rudder head. An SD-082010 fairlead on the downhaul line protects the bottom of the rudder head from abrasion.  Also visible is the SD-520010 drain plug.

The rudder uphaul line leads to a SD-043030 cleat on the port side of the tiller. The downhaul line leads to an auto release clamcleat on the starboard side of the tiller.

The mizzen mast has three SD-043030 cleats at its base. One for the halyard, one for the snotter, and one for the topping lift. The mizzen sheet leads through a RL-260-S cam cleat, similar to the jib sheets.

Atop the mizzen are two blocks, one for the halyard and one for the topping lift. They are RL318 spin straps and RL-205 swivel blocks.

The snotter leads through two SD-081200 pad eyes. A stop knot is tied in one end, thread it through and cleat it off. This arrangement is simple and works just fine.

I built my mizzen mast as a "rotating mast".  Past experience with sprit booms and snotters has taught me that if the mast cannot rotate, when the sail is eased out, the snotter will put considerable pressure on the pad eye on the mast and something will break.  To allow the mast to rotate, I rounded the bottom of the mast and lined the mast partner with leather and allowed sufficient clearance so the mast fits loosely within the partner.    
Two more SD-081200 pad eyes attach the mizzen sheet and mizzen clew with carabiners and the topping lift.

The mizzen tack attaches to yet another SD081200 pad eye with a carabiner. [Update: I replaced the carabiner with an s-hook, with the pad eye side of it pinched closed. It is much easier to release the tack for furling now]  The plans show a downhaul line that goes through a pad eye on deck to a cleat. That arrangement would have prevented my rotating mizzen mast from rotating.

The boomkin has a SD081200 pad eye and SD-191410 ring.

It took a considerable amount of tweaking to get my new Suzuki 2.5 outboard to clear the transom in the raised position using my Duckworks motor mount. Mine is the 15 degree model. The Suzuki 2.5 comes with a bracket that only allows the motor to be raised when the motor is pointing forward. Facing forward, the power head hits the transom so I had to remove this bracket to allow the motor to be raised on its side.  I also had to add the thickest possible wood block to shift the motor aft as far as possible, and I had to shift the motor as far starboard as possible. I finally got it to clear - barely.  Other outboards have different sized and shaped power heads that may make them easier to fit using this mount. An adjustable mount might be a better choice as well.


Here are my mast carriers. They were constructed from leftover 2x4s, scraps and some brackets I had lying around. It works very well and it requires no modifications to the boat. The forward one rests on the foredeck and ties into the forward cleats.  The aft carrier rests on the side deck and is held down with a short line that goes through the cam cleat for the mainsheet. Foam pads protect the deck and foam-lined notches hold the lashed down main, mizzen, boom and gaff.

Setup time at the boat launch takes about 30 minutes.  Here is a time-lapse video.


I hope these examples help someone. If you have any questions or comments, please post them below. Feedback is always appreciated!
Read More..